How to Setup Google Tag Manager (GTM)
Disclaimer: This guide is more technical than most of the guides I create on this blog, but if you don’t mind trying something new, it will pay off in the future if you need to scale your blog or website.
Benefits of Google Tag Manager
Tag Manager gives a consistent user interface to fine-tune how you want to track code snippets and tags on your website.
Say you hired a marketer to help you start running ads on your website. Likely the ad platform would give them a code snippet (or tag) to add to your website.
Before Tag Manager, each time a snippet needed to be added, you would have to ask your developer to do it.

Now with Tag Manager, you will just need to share access to your Tag Manager account and they can add as many tags as they need on their own.

Installing Google Tag Manager
Start by going to tagmanager.google.com.
Sign into an existing Google account or sign up for a new one.
You will arrive at this screen where you need to create a tag manager account.

Click Create Account button to get started.

Account Name – Type in any account name. A brand name will be fine here.
Container Name – Type your domain here and select “Web” as the “Target platform” meaning you want to track your website.
Click Create button.
On the Terms and Conditions page, check the checkbox at the bottom and click Yes to agree to the terms.
You will be presented with two code snippets, one for the <head> and one for the <body>
If you have a software developer on your team, you can pass these to them and they will know what to do with them.
Otherwise, install a code snippet manager, then paste the two snippet codes and continue below.

After you press OK, you will advance to the Google Tag Manager Dashboard.
Click the Preview button

You will be shown a Tag Manager Preview Mode pop-up (make sure your pop-up blocker is disabled to see it)
Type your domain into the “Your website’s URL” field and click Connect button

Another pop-up will appear which shows your website and if everything is working you should see the words “Connected” and “Tag Assistant Connected.”

Connecting Google Analytics 4 to Tag Manager
These instructions presume you already have Google Analytics 4 setup and therefore have a Data Stream measurement ID.
Finding your Google Analytics 4 Measurement ID
In your Google Analytics dashboard, click Admin in the bottom left corner, then find Data Streams under the Property column.

Select the Stream you setup previously for Web Streams. When you open it, look for the Measurement ID. Leave this tab open as you’ll need this ID later in this guide.

Creating a Google Analytic Tag in Tag Manager
Back in Tag Manager
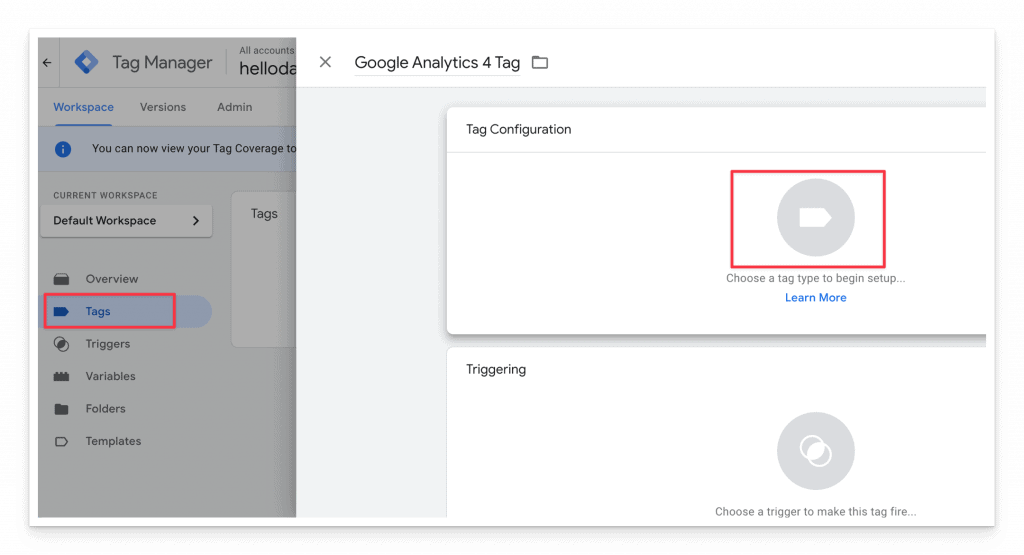
- Click Tags on the left-hand side
- Then click New (not pictured)
- Then click the tag icon in the middle under Tag Configuration section
This will bring you to an overlay where you can select tags. Select Google Analytics: GA4 Configuration

- Back in Google Analytics, copy the Measurement ID from the previous step
- In Tag Manager paste the ID in the Measurement ID field (see below)
- Toggle open the Fields to Set option in the same window
- Set the Field Name to “debug_mode” and the Value to “True“
- This will allow debug mode to pick up the events right away so you can test that this tag is working correctly
- Save your changes

Next, scroll to the bottom and click the icon in the Triggering section. You need to tell Tag Manager when to enable (or “fire”) this tag.

Select All Pages as the trigger and then Save this tag.

Testing the Tag
On the Tag Manager dashboard, click the Preview button and then Connect button if prompted to in the next screen.

This will load another window with the website you are testing.
Next, back in Google Analytics, go to Configure > Debug View.
In the other window where the website popped up, navigate to a different page on the website.
If everything is set up correctly you should see events firing in the Google Analytics Configure > Debug View window.
Check the Top Events column for a summary of the session (pictured below)

If the events are firing, then you can move on to the publishing step.
Publishing a Tag
Back in the Tag manager dashboard, click the Submit button.

Then give it a Version Name like “Google Analytics 4 Install” and click the Publish button in the top right corner.
Congratulations! You have successfully configured Google Analytics with Google Tag Manager.
From this point forward, you can come back to check your analytics in the Google Analytics platform.


