How to Sign Up for a Professional Gmail Email
In this article, I go over step by step how to purchase your professional Gmail email and connect it with your website domain. For example hello@yourcompanyname.com
Review the Features and Pricing
First, go to the pricing page and review and select the package that fits your needs. I’ve never needed more than the Business Starter package as it already includes more than enough storage space to get started.
Note that this is a recurring expense each month or year depending on how you decide to pay.
Every plan includes your main google apps: Gmail, Drive, Calendar, etc. If you are looking for an app and it is not listed there, then it may be an additional add-on, however, the apps that come with the main plan should cover 99% of your use cases if you’re just starting out.
Note these prices on the screen below are in Canadian Dollars so the US Dollars will have their own pricing (or whichever country you are purchasing this from).
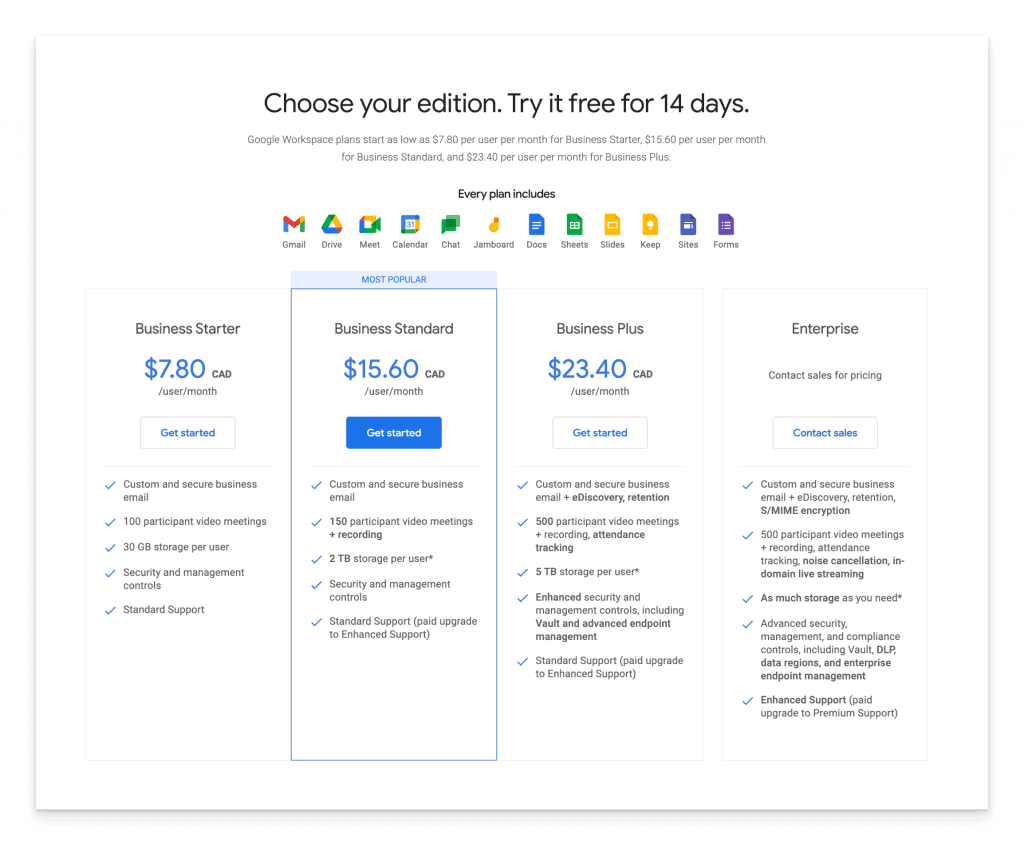
How to Sign Up for a Professional Email
When you’ve decided on a package, click the blue Get Started button on the appropriate package.
Next, fill in all the business information (Business name, etc.).
Here are some tips on specific parts of the form
- Business Name – If you have a registered business name with your state or province, you could use this name here.
- Current email address – this should be a personal email address and helps with account recovery if you ever lose the password. Make sure to use a real email address here, it will not be shown to the public. Do not enter the email you are trying to purchase in this field.
- Does your business have a domain – this step is important. If you already purchased a domain (URL) then make sure you click “Yes, I have one I can use” and follow the prompts after.
If you haven’t purchased a domain yet then follow these instructions here and then come back and finish this step.
After you purchase your domain fill in the domain field. In my case it’s https://hellodavelin.com
In the next step, fill out the username and password. This is what you will use to sign in. If you had a Gmail account before, the sign-in process will be the same except with your new email.
For example, if I wanted to purchase the exact email “hello@hellodavelin.com” this is what I would type in the Username field (see below). This email cannot change without purchasing another email so do be certain of the username.

Check the captcha box and Agree and Continue button to proceed.
You’ll be prompted to select a plan. By default, you will not be presented with the Business Starter option. Instead, you need to start at least on the Business Standard plan or higher to complete the checkout process.
I’ll go over how to downgrade to the lowest tier later in this article. For now, pick the Business Standard and choose whether you want a monthly recurring payment or annual recurring payment, and click Next.
Note, on the lowest tier (Business Starter), there is no discount for selecting an annual payment plan. I would recommend going monthly so you can cancel at any time.
On the checkout page, fill out the Name and address, Contact, and Payment method fields.

If Google is running a promotion, you won’t be charged until the promotional time is over. For example, if they have a 14-day promotion, your credit card won’t be charged until the day the promotion ends.
Be sure to cancel before the end of the promotional period if you change your mind and don’t want the professional email.
After you check out you can click Continue to setup and login using the username and password you gave during the setup.
After signing in, you will arrive at the Admin Dashboard.
During the first sign-in, it may ask you for a phone number. This also helps with account recovery in case you lose your password. It is recommended you provide a phone number if you have one available that can accept text messages.
After you get through the initial tour of the admin dashboard you will be presented with three steps:
- Protect [your domain]
- Create new users
- Activate Gmail for [your domain]
At this time you don’t need to learn how to use the admin dashboard. You just need to finish the setup and then you’ll use your email like any other Gmail account.
Step 1 – Confirming your domain
In this step, you need to add a TXT (text) record to prove you own the domain.
Start by clicking the blue Protect link under step 1.
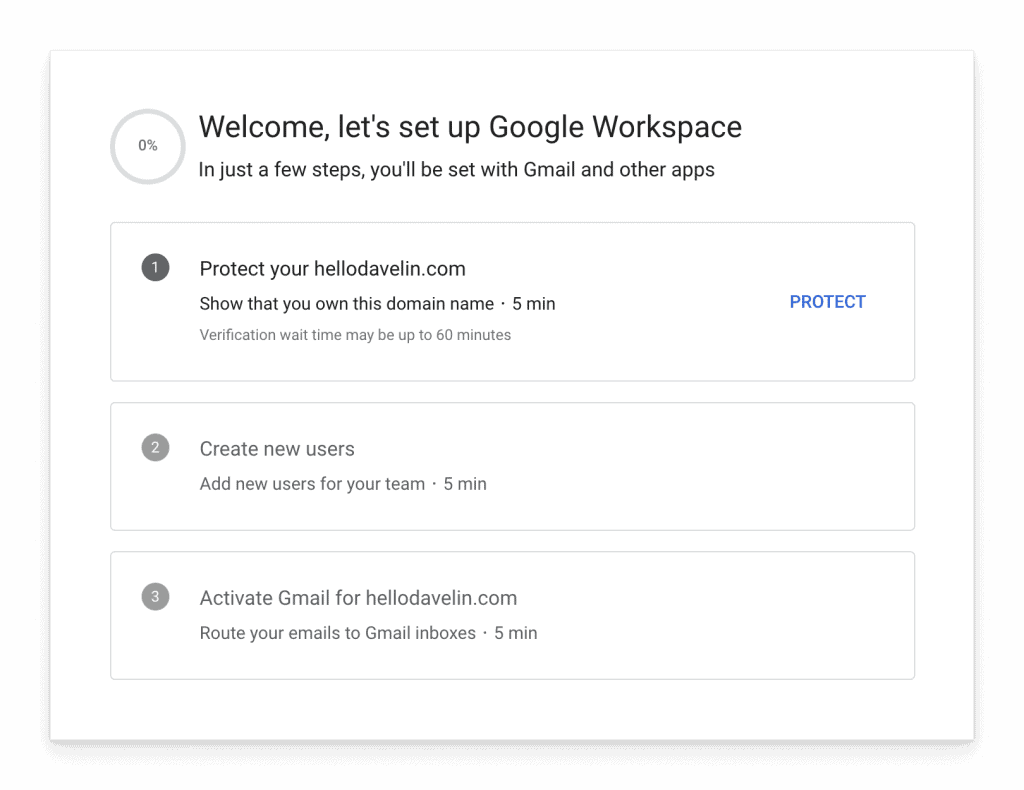
Then click I’m ready to protect my domain.
At this point, depending on where you purchased your domain, Google will supply the corresponding instructions on how to add a DNS record (where the TXT record lives).
The Google instructions will tell you to make this change where you purchased your domain (in my case Namecheap).
But if you have a host already (for example, your website is already online) then you want to make this change where your hosting is at (i.e., Siteground or Bluehost).
Click the Next: Go to Step 2 on the bottom right of this screen to advance to the next section
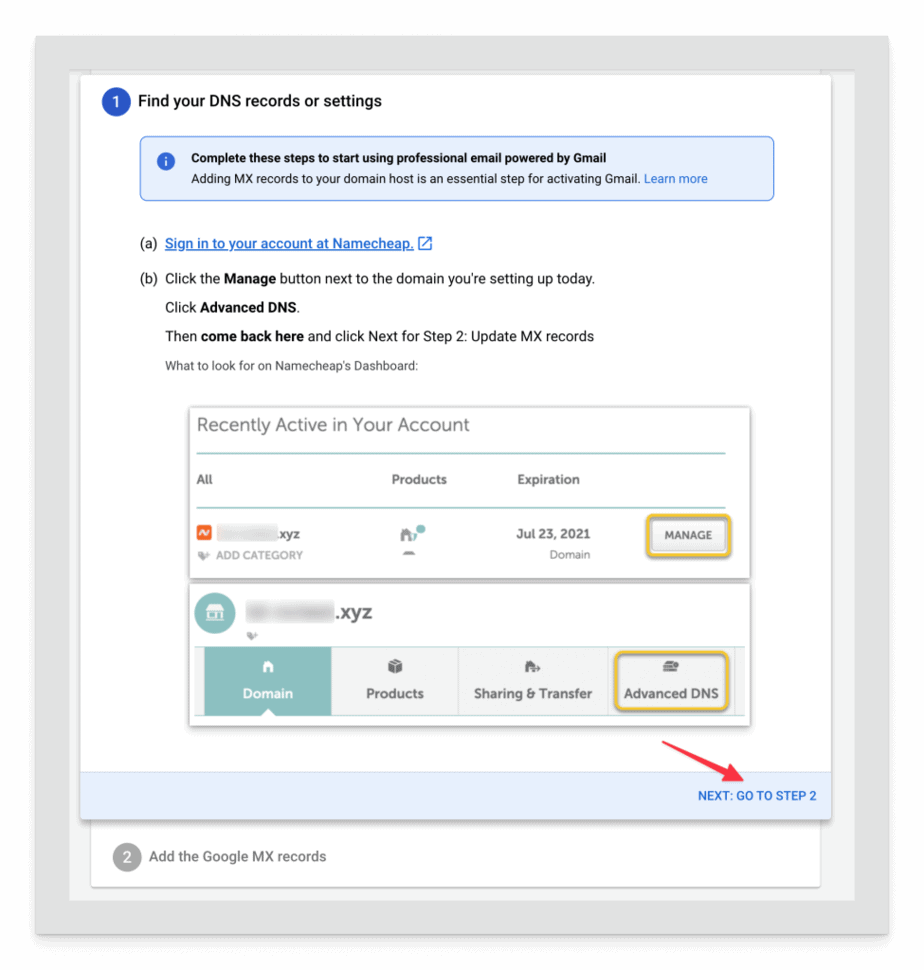
Google will provide you with a TXT record and it will look something like this below.
google-site-verification=abcdefg… where “abcdefg” is a unique code for your website.
Do not share this verification code with anyone.
Next, log into your host. For this example, I log into Siteground.com because that is where my website is hosted.
If you’re using another host, the steps will be similar, but the screen options will look slightly different from host to host. Also, each host should have a way to live chat with their customer service. You can often ask them to help you with this step if you get stuck.
Find the section of the host dashboard where the DNS configuration can be updated. You might need to google search a bit if you are not using Siteground.

To complete this step:
- go to your DNS Zone Editor
- make sure you are on the TXT tab under the “Create New Record” section of the DNS Zone Editor page.
- add the verification code under the Value field
- leave the Name field empty
- Click the Create button
This will add the verification record to your host. Now go back to your Google admin panel and refresh the page to start Step 2.
Step 1 may take 5-10 minutes to refresh.

Step 2 – Creating new users
Do not complete this step unless you want to purchase additional emails at an additional cost per email.
If you’re just getting started online for the first time you can skip this.
Step 3 – Activate Gmail for Your Domain
In this step, you will add what’s called MX records or a Mail Exchange record. This tells your host where your email files are and to associate your domain properly with the new email you just purchased.
Click Activate and then I’m ready to activate Gmail to get started on this step.
You’ll be at the instruction screen similar to Step 1 above. Again, assuming you already have a website running, just click Next: Go to Step 2

Stay on this Step 2 screen where it has the Activate Gmail button in the bottom right-hand corner. Do not follow these instructions. Instead, open a new tab and log into your website host dashboard.

For my hosting, I’ll go back to my Siteground DNS page.
- Select the MX Tab
- Click Switch to Google MX records option – this will preconfigure the Gmail MX records automatically for you.
- Click the Create button to finalize this step
Note that after completing these steps below you will switch all of the emails going to @yourdomain name to this new Gmail email.

Wait for about 5 minutes and then return back to the other tab we left open in the Google admin dashboard and click Activate Gmail on the bottom right

Google will check for those new MX records you created and if everything was set up correctly, you’ll get this confirmation screen.
Congratulations! You’ve just set up your first professional email!

Back at the Admin Dashboard, just click Skip for Now since we are skipping the “Create new users” step.
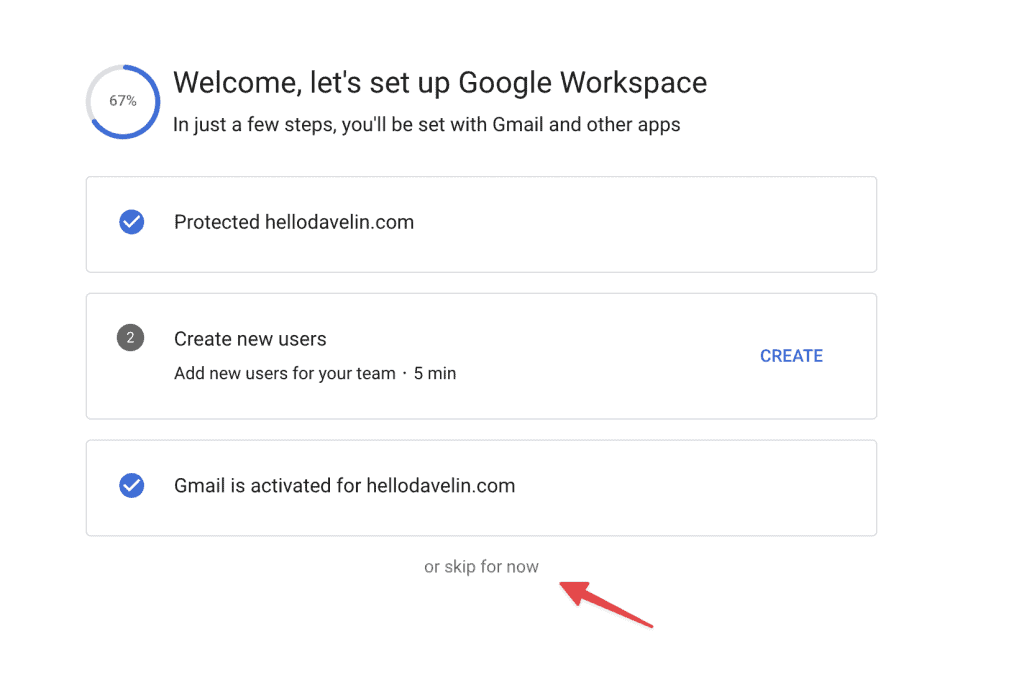
On the next page, send yourself a test email and check your Gmail inbox to make sure it arrived. If it doesn’t arrive, try it in a few minutes and if it still does not work, you’ll need to contact your host customer service and have them walk you through the steps above.

Updating to Business Starter Subscription
At this time you’ll want to downgrade to Business Starter if you want to be on the least expensive plan, otherwise, when the promotion is over, you’ll be billed at the next tier up.
- Go to Admin Dashboard and login with the account you have just purchased
- Navigate to Billing > Subscriptions
- Select your subscription
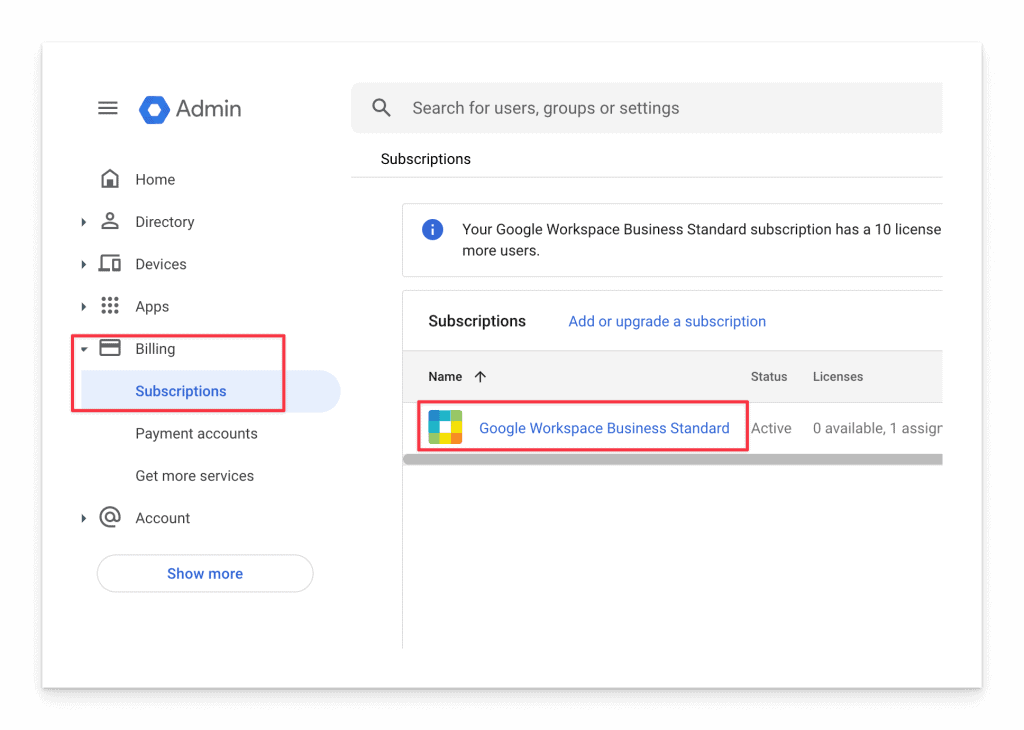
Click the Upgrade or Downgrade option.
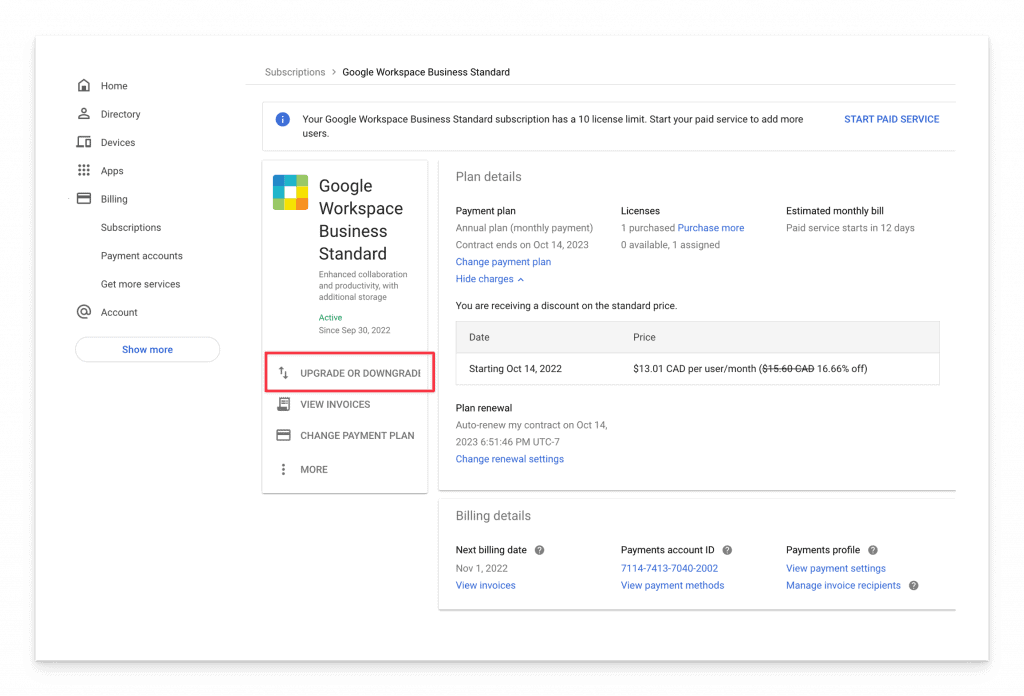
Then select and confirm the subscription tier Google Workspace Business Starter and click the Switch button.
Reconfirm the checkout information on the updated plan and click the Checkout followed by the Finalize button to complete this change.
That concludes this walkthrough. You now have a new professional email that is verified with your website domain.
Congrats!


